
.svg "English")
.svg "Deutsch")
This article will explain to you how to install Minecraft shaders for free with the latest versions of Java Edition. This tutorial works with old and new versions alike because nothing changes in the installation process. Only the version numbers change. Furthermore, it is no problem if you have a bad graphics card because the installation works with any hardware. Moreover, it doesn’t matter if you use a low-end PC, because there are also some FPS boost shaders that you can download and install for free.
In comparison with texture packs, they offer much more significant improvements, because they completely turn the gameplay upside down. Overall, it definitely makes sense to play with a shader pack, because it improves the vanilla graphics. Most admirable are the new water effects, which reflect the sky on the water’s surface and add small waves. The only drawback is the night because shaders are often too dark there. Therefore, it is recommended to turn off a shader at night so that it is bright enough.
1) Install Minecraft
Obviously, Minecraft must be installed on your computer. So you get Minecraft and download the game. I strongly assume that you have already done this because you want to install shaders in Minecraft
However, it is also mandatory that you have started the update at least once because only then this game version will be downloaded from the launcher. You do this by clicking on Java Edition on the left side of the launcher, and you have to pay special attention here because the Windows Edition and Minecraft Dungeons are also listed in the same place. Then click on Installations at the top and click on the button labeled “New Installation”.

A new window will open, and you can give the installation a name, but more important is that you select the Wild Update. In this selection window, you will find it under the name “Latest release”. Theoretically, you can also adjust the resolution here, but this is not necessary if you play in Full-screen mode. However, it is recommended to choose a low resolution if you have a low-end computer.
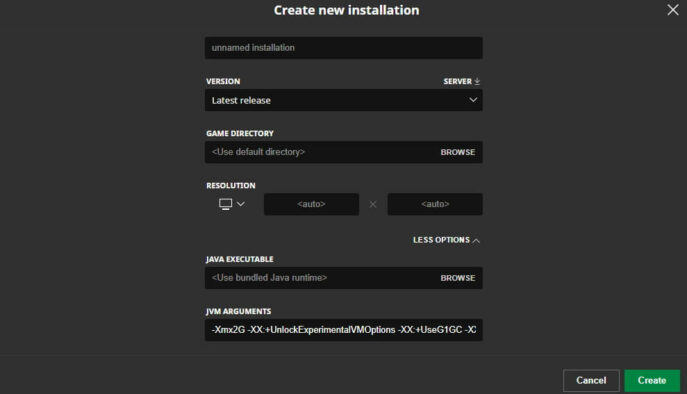
Finally, you can click on the green “Create” button in the bottom right corner. This new installation will now be displayed in your list and is ready to be started by you. Once again, you need to click on a button. This time it is the “Play” button. Minecraft will then download files that are also needed to install shaders.
2) Install Java
The next step is to install the Java program. After that, you can continue with the shaders mod, which will be the topic under the next heading. If you are not sure if you already have Java, just install it again. In the worst case, you will only get a newer version of the app.
First, you need to know what operating system your computer has. If you have a new device, then it most likely has a 64-BIT architecture. But you should better check again under the system information if this is really true. For example, I’m using an x64-based PC. That’s why I download the file for this operating system on the Java download page. By the way, you can also do this with an Apple device that uses macOS and with a computer that uses Linux.
Go to your download folder after the successful download and double-click on the Java file. The installation wizard is very simple, and you just have to click on “Install”. If you have older Java versions installed on your computer, you can either delete them now. I don’t care, which is why I skip this step. By the end, you will be told that everything worked, and you can move on to the next step.
3) Install OptiFine
Slowly but surely you are getting closer to your goal of a shader. But now it’s time to install Optifine. This mod has replaced the GLSL shaders mod for a few years now, which is no longer being updated. Go to this OptiFine download page and download the file there. Normally this version is also compatible with Forge, Fabric, and Optifabric.
Your browser will warn you that this file type could harm your computer. You can ignore this warning with a clear conscience because this error message is always displayed for JAR files. Unfortunately, I don’t know why this is happening. Accordingly, you click on “keep” and Optifine will be moved to your download folder. In this folder, you right-click on Optifine and the installation wizard opens. This is only possible if you have installed Java correctly in the previous step. In the installation wizard, you just click on “Install” and you can start playing with Optifine.

But before that, you have to select the new installation profile in the Minecraft Launcher. You can do this easily via the dropdown menu or via the installations tab that you already used in the first step of this tutorial. The name of the new Optifine profile is something like “release OptiFine_HD_U_G9”.
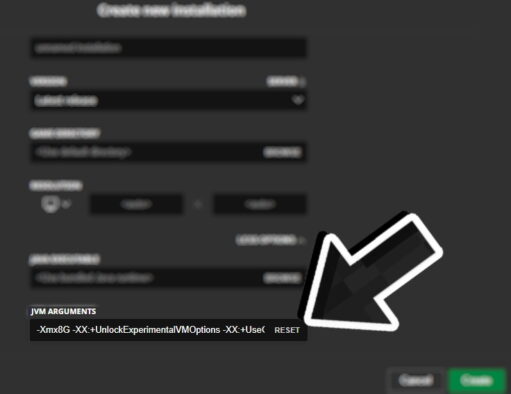
In addition, you should allocate more RAM to Minecraft under JVM arguments so that your shaders don’t lag and bugs don’t occur. For this, you change the number in the fifth position. In this example, “-Xmx2G -XX:+…” it would be 2, which you have to replace with a higher number. Before you do that, you need to know how much RAM your PC has, because you should never use more than half of it for Minecraft. Personally, I have 16 gigabytes of RAM, which is why I allocate 8 GB to Minecraft. So I type “-Xmx8G -XX:+…” at the beginning of the JVM arguments. You have to leave all the other letters untouched or Minecraft will crash.
Click “Create” and you can finally play Optifine in Minecraft. With this mod, you can also zoom in Minecraft to have a closer look at the installed shaders later.
3.1) How to fix Optifine not opening
Here you will find solutions to problems that often occur with Optifine. If you were able to open the program without any issues, you can skip the following paragraphs and continue with the next heading.
A common problem is that your computer has another program set to open JAR files. This is frequently Winrar or 7-Zip. They are helpful with resource packs, but this is not the case with shaders. However, this is not the end of the world and as a solution, you right-click on the OptiFine file. Then click on “Open with” and select Java™ Platform SE binary as the new program to open JAR files. If Java does not appear in the list, go to “Select another app” or open the following file path “C:\Program Files”. This is the location of all your programs and inside the Java program folder there you click on the newest subfolder. Then select the “javaw.exe” file in the bin folder and run it. Often this is the solution to the problem that OptiFine does not open.
Unfortunately, in very rare cases there may be further difficulties. I don’t want to overwhelm you with technical backgrounds, and therefore short and sweet: Jarfix is the solution. It is a simple software that corrects the program assignments.
One of these solutions will surely have worked for you. If you still have questions, feel free to ask them in the comments.
4) How to install a Shader in Minecraft
The last thing to do is to install shaders in Minecraft. Although the whole article is about it, now it finally comes to it. Everything so far has just been preparation. Maybe you’ve already picked a shader pack, but if not, I’m happy to help. The following YouTube video shows the best ones in about eight minutes. In my opinion, SEUS, Chocapic, and BSL achieve the best performance. They are also popularly used by big YouTubers.
You can find the official download links in the Minecraft 1.21 shaders list. Instead, you can also click on the links in the video description, which is much faster. Do not unzip the shader of your choice once it is downloaded. Otherwise, it will not work.
Now start Minecraft with Optifine and click on options in the main menu. Then go to the video settings and there you will find the shader settings. Inside there is a button that opens the shader folder. This is the shader location, and you have to move the ZIP file of your shader for to this folder. After that, the pack will be displayed in Minecraft. Activate it by clicking on its name, and it will be loaded.
On the right side, you can make a few technical settings, but for beginners, this is unimportant, because the default settings are quite sufficient. Anyway, now you have managed to install a Minecraft shader for free and from now on you can add an unlimited number of them with this guide.
Common problems and their solutions
First, this problem has nothing to do with a faulty installation. Everything will turn black in Minecraft if your hardware is not good enough or the shader is made for an older game version. The error message “error invalid program composite” also often occurs in connection with this. You fix both bugs by removing the shader and installing one that is compatible with low-end laptops and PCs. The expensive alternative is to buy more modern gaming equipment.
If you have low FPS, it is always recommended to reduce the render distance in the options. This way, your PC has to render less, and you have more bandwidth available. Also, it is helpful to use only texture packs with shaders that have a low resolution. It’s best if you get an FPS number between 30 and 60 because then it doesn’t lag anymore.
Conclusion about Minecraft Shaders installation
Overall, it is much more difficult to install a Minecraft shader than a resource pack. Nevertheless, I hope I’ve explained the procedure well enough for you to get it right. Unfortunately, at the moment it is not possible to play with shaders on consoles, because no free add-ons from the internet are supported. This feature is only available for Java, MCPE, and Bedrock players at the moment. I hope you’ll check back here for the next major Minecraft update because you’ll be able to use this walkthrough again.
It’s the best
I WANT TO DOWNLOAD SHADERS
ME TOO
THIS IS CRAZY